lucy@zlwyindustry.com
+86-158-1688-2025
Please Choose Your Language
- All
- Product Name
- Product Keyword
- Product Model
- Product Summary
- Product Description
- Multi Field Search

Views: 0 Author: Site Editor Publish Time: 2026-08-08 Origin: Site


Air trapped in your heating system after a run-out or component swap instantly stalls operations. It forces your primary control to lock out the burner completely. Dealing with this interruption properly keeps your home or facility safe and warm. Improper priming causes severe consequences. Unignited fuel can quickly pool inside the combustion chamber. This volatile pooling creates massive safety hazards and damages your equipment. You cannot afford to guess when resetting your system. We structured this guide to give you technical, risk-aware steps. You will learn the exact sequence needed to safely restore operational status. We explain how to force trapped air out while preserving your internal components. Follow our clear guidance to eliminate costly downtime without compromising overall system integrity. Mastering this basic maintenance step empowers you to identify when professional help becomes necessary. Correct procedures protect your investment and ensure long-lasting performance.
Understanding oil burner pump priming is critical for fast system recovery. Interruptions stop fluid dynamics completely. When you finish a filter change, survive a tank run-out, or perform routine fuel line service, air naturally enters the piping. The burner motor turns on, but fuel pressure drops to zero. Ignition fails entirely. Cold facilities and costly downtime follow rapidly.
You need to establish clear success criteria. You want a solid, bubble-free stream of heating oil flowing smoothly. Ignition must trigger within the safety timing window. This window usually lasts about 15 seconds. Meeting these criteria yields stable, sustained combustion.
We must also acknowledge implementation reality. Heating networks use different mechanical designs. Two-pipe systems usually self-prime. They use a return line to clear air automatically. If they fail to prime, they suffer from severe line breaches or excessive lift issues. One-pipe systems lack this return path. They always require manual intervention. They depend on you to actively purge trapped air. This guide focuses entirely on manual purging for one-pipe configurations.
Should you perform maintenance yourself or call a professional? We separate solution categories into in-house DIY execution versus escalating to a licensed HVAC technician. We evaluate risk and capability across several critical dimensions.
Safety and compliance sit at the top of our evaluation. Handling Class 2 combustible liquids demands strict adherence to environmental regulations and fire safety codes. Unignited fuel pooling poses a severe risk. You must respect the chemical properties of heating oil.
Consider cost versus outcome carefully. A DIY prime essentially costs nothing. However, a botched attempt carries severe financial risks. Forcing the unit to run dry damages the transformer or burns out the primary control. You quickly turn a $0 task into a $500 repair bill.
Equipment access matters greatly. Look at your unit physically. Assess whether the bleeder valve sits in an accessible spot. You need specific clear vinyl tubing. You must own the appropriate tools to avoid stripping the soft bleeder nut.
Use our decision matrix before proceeding. You must understand the reset button limits completely. You also must verify your fuel tank holds clean, settled oil.
| Evaluation Criteria | DIY Execution Indicator | Professional Service Indicator |
|---|---|---|
| Safety Knowledge | Understands lockout timing and pooling risks | Unsure of "puff-back" dangers or reset limits |
| Tool Availability | Possesses correct wrenches, vinyl tubing, catch pan | Lacks proper fitting wrenches or containment vessels |
| System Setup | Easily accessible one-pipe configuration | Complex two-pipe failure or buried external lines |
| Failure History | First attempt after a known tank run-out | Multiple failed previous attempts with unknown causes |
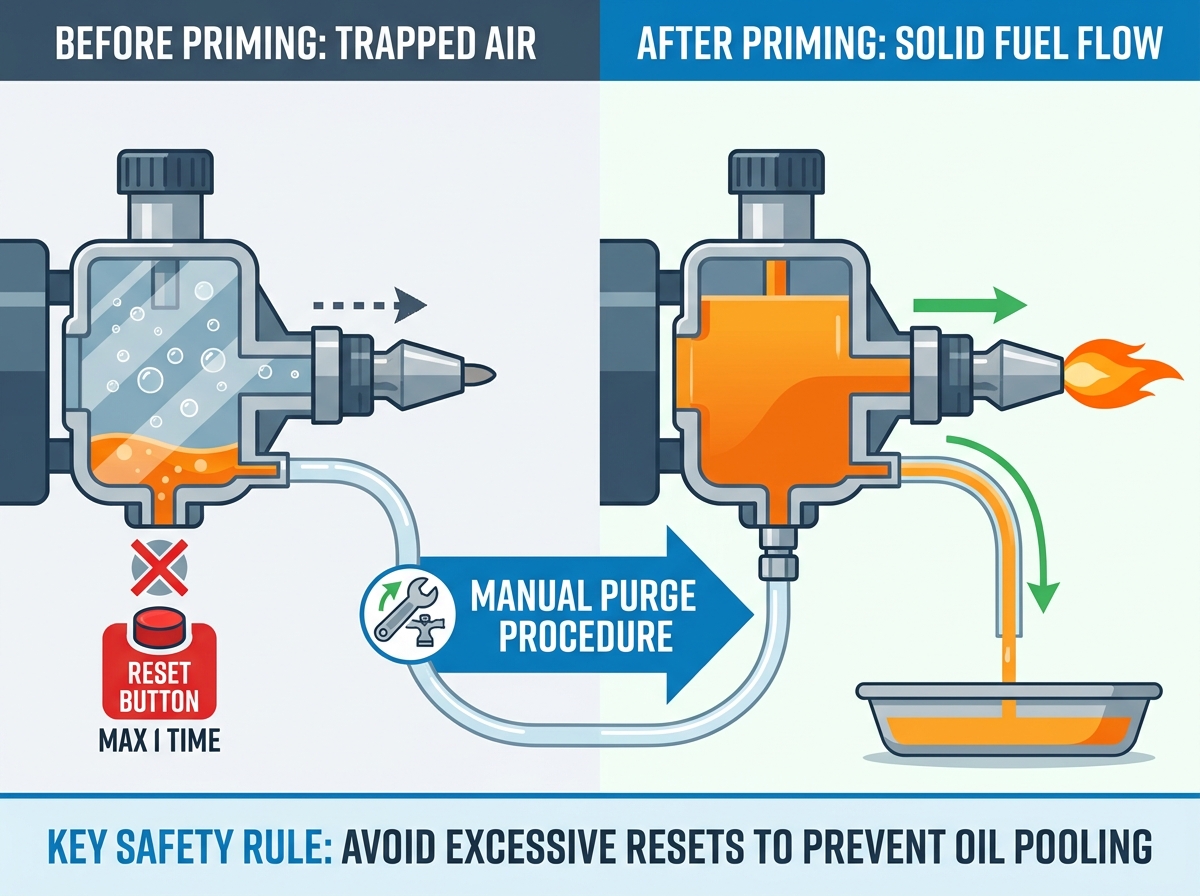
Safety forms our preparation baseline. Disconnect power at the main emergency switch immediately. Locate your bleeder valve. You usually find a 3/8" or 7/16" hex nut mounted directly on the pump body. Attach clear tubing securely over this nipple. Route expelled fluid into a clean catch container. You are now ready to prime burner oil pump components safely.
Follow this strict execution sequence:
Risk mitigation requires patience. The safety lockout timer might shut the motor off before a solid stream appears. If this happens, turn off the power. Close the valve tightly. Wait the manufacturer-specified reset period. Attempt the purging sequence only one more time.
Sometimes a system fails to prime despite your best efforts. You need to evaluate your attempt to bleed oil line configurations systematically. Identifying specific symptoms helps spot deeper mechanical issues.
The first common symptom happens when the motor runs, but no oil exits the bleeder valve. Probable causes include severe sludge blockage at the tank valve. You might face a totally clogged inline oil filter. A sheared internal coupling also stops fluid movement entirely.
The second symptom occurs when oil flows, but it never stops sputtering. Constant air bubbles indicate a vacuum leak somewhere. Check your flare fittings carefully. You might have a compromised filter gasket o-ring or highly porous copper lines pulling ambient air.
The third symptom presents a solid oil stream, but the burner still refuses to ignite. Your probable causes shift toward combustion components. You likely have a clogged burner nozzle. You may also have a failed ignition transformer or badly fouled electrodes preventing the spark.
Perform an evidence-oriented assessment immediately. Stop pressing the reset button. Hook up a mechanical vacuum gauge. Test the unit pull capacity objectively. A reading of zero indicates a massive air leak or a completely dry tank. A very high reading points directly to a severe restriction located in the supply piping.
| Observed Symptom | Primary Diagnostic Indicator | Probable Root Cause |
|---|---|---|
| Motor runs, zero oil flows | No vacuum generated | Sludge blockage, clogged filter, sheared coupling |
| Oil flows but sputters continuously | Fluctuating vacuum pressure | Vacuum leak at flare fittings, broken o-ring |
| Solid stream, zero ignition | Normal vacuum, no spark/spray | Clogged nozzle, failed transformer, fouled electrodes |
You must decide between further localized maintenance and full oil pump replacement. Start with rigorous component evaluation. Your vacuum gauge test might reveal the unit cannot pull fluid. If supply lines remain completely clear and the tank sits full, your internal gearset has likely failed. A blown shaft seal causes similar catastrophic suction loss.
Follow specific shortlisting logic when buying replacement parts. Compatibility is absolutely crucial. Match the motor speed carefully. Units spin at either 1725 or 3450 RPM. Verify the mechanical rotation direction. Options include right-hand or left-hand configurations. Match the exact nozzle capacity measured in GPH.
Prioritize brand authority during your selection. Evaluate industry-standard replacements like Suntec or Danfoss. Base your purchasing decision on current OEM specifications. Consider future-proofing your entire system. Upgrading to a modern model featuring an integrated solenoid valve provides much cleaner shut-offs. This directly reduces soot accumulation inside your heat exchanger.
Your final action determines system safety. If you confirm critical component failure, source the exact replacement part immediately. If you feel unsure about calibration, contact a certified HVAC contractor. They handle complex installation, precise pressure regulation, and vital combustion analysis safely.
Resolving air-locks quickly requires a delicate critical balance. You must restore fuel flow rapidly while completely respecting the safety limits of your primary control. Successfully purging your lines demands mechanical precision, specific tools, and immense patience. Rushing the manual process introduces dangerous variables into your facility.
We strongly advise treating persistent purging failures as diagnostic indicators. They rarely represent a failure of your personal technique. Instead, they point to broader system compromises needing attention. Escalate these deep-rooted mechanical issues to certified professionals. Expert intervention protects your property, restores reliable heat, and ensures long-term operational stability.
A: Limit yourself to one or two times strictly. Repeatedly hitting the reset button pumps unignited fuel into the combustion chamber. This pooling oil vaporizes rapidly upon eventual ignition. It creates a violent puff-back explosion. This event pushes toxic soot throughout your building and heavily damages the furnace structure.
A: Zero fluid flow indicates a complete supply interruption. You likely have an empty fuel tank or a heavily sludged tank valve. A totally clogged inline filter also halts flow entirely. In freezing environments, gelled fuel or frozen water inside exterior piping blocks the suction line completely.
A: You rarely need to bleed a two-pipe configuration. The dedicated return line creates a self-priming mechanism. It naturally routes excess air back into the main storage tank. If a two-pipe setup loses prime, you face a severe vacuum leak, a blocked return line, or an excessive lift issue.
A: Yes, you can reuse it, but proceed with extreme caution. The recovered fluid must be entirely free of sludge, water, and microscopic debris. Dirty fuel instantly clogs the microscopic passages inside your burner nozzle. We recommend filtering the bled fluid through a fine mesh before returning it to the tank.