lucy@zlwyindustry.com
+86-158-1688-2025
Please Choose Your Language
- All
- Product Name
- Product Keyword
- Product Model
- Product Summary
- Product Description
- Multi Field Search

Views: 0 Author: Site Editor Publish Time: 2026-08-08 Origin: Site


Burner lockouts, intermittent heating, and unusual mechanical noises often point directly to hidden fuel delivery issues. These frustrating disruptions can quickly halt critical heating operations. They frequently leave commercial and residential facilities dangerously cold. Many technicians instinctively blame the mechanical pump when they hear strange noises. They often assume internal failure causes a sudden ignition shutdown. However, these robust mechanical components rarely fail entirely on their own. External variables usually act as the true root cause. Compromised piping, severe temperature drops, or poor filtration frequently trigger these faults. You must establish a strict evaluation standard to prevent recurring downtime. Resolving these operational failures requires systematic vacuum testing rather than blindly swapping parts. In this comprehensive guide, you will learn how to accurately diagnose common fuel system faults. We will walk you through differentiating between physical cavitation and environmental air leaks. This knowledge allows you to implement targeted, permanent system repairs.
Diagnosing burner faults begins with recognizing specific acoustic and behavioral cues. You must correctly identify what the pump is communicating before taking tools to the system. Misdiagnosing the symptom often leads to unnecessary component replacement. It leaves the underlying piping issue unresolved.
Listen closely to the operational noise of the system. oil pump whining indicates a serious physical phenomenon. The sound resembles marbles or gravel grinding inside a tin can. It usually presents as a distinct, high-pitched mechanical squeal. This noise occurs when internal pressure drops below the fuel's vapor pressure. The liquid heating oil temporarily turns into vapor. These vapor bubbles travel through the internal gearset. They reach the high-pressure discharge side and violently collapse. This rapid implosion creates a shockwave. The shockwave strikes the pump gears and generates the screaming noise.
Air intrusion behaves differently than vapor implosion. Behavioral signs emerge when environmental air enters the closed suction loop. You might notice delayed ignition during the firing sequence. The burner might produce rumbling fires and unstable flame patterns. You will frequently find yourself pressing the primary control reset button. The system often requires manual bleeding after sitting idle for several hours. These signs point to a broken siphon effect. Air fills the void where liquid oil should remain.
You must establish the physical difference between these two conditions. They require completely different diagnostic approaches. Cavitation represents a liquid-to-vapor phase issue. It results directly from fuel starvation and excessive vacuum. Conversely, losing prime represents an environmental breach. External air physically enters the system through a mechanical defect. One issue requires clearing a blockage, while the other requires sealing a leak.
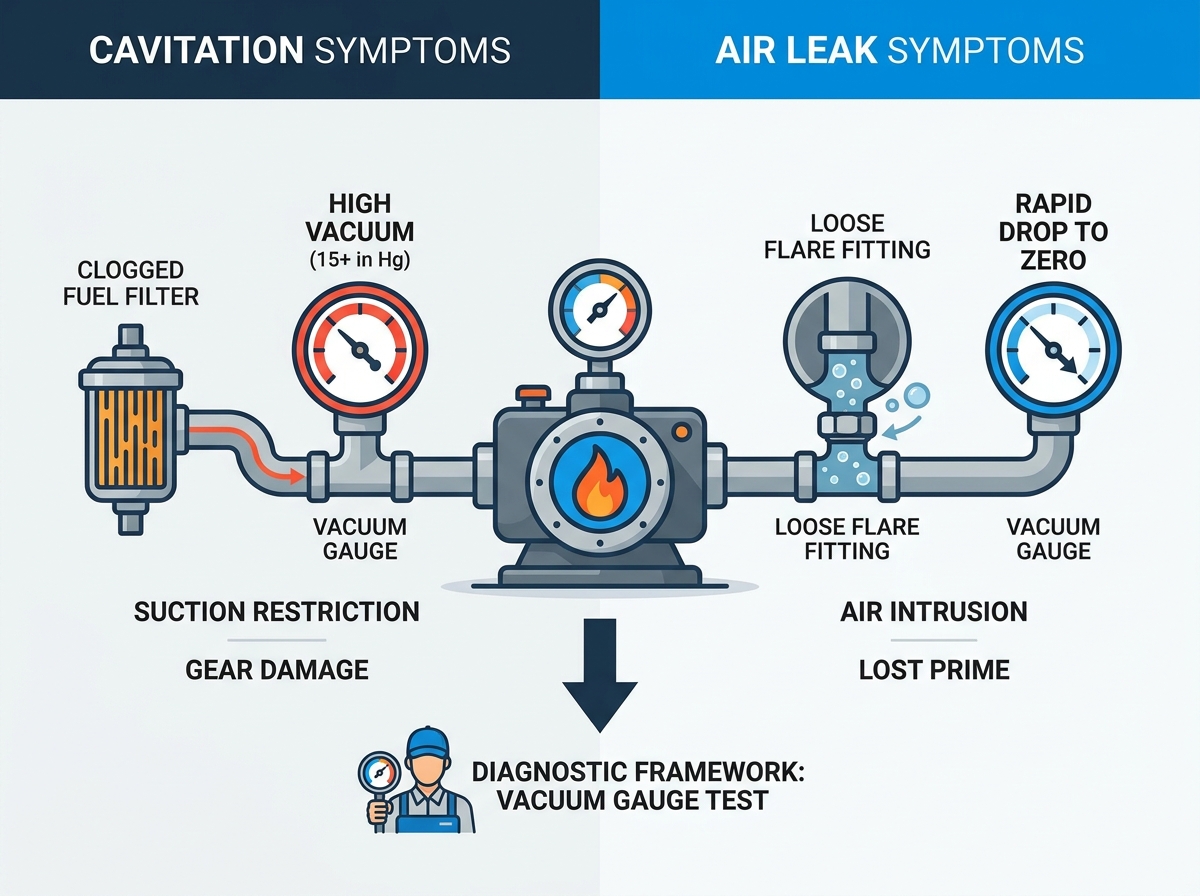
Fuel starvation forces the internal gears to pull harder against the incoming fluid. This extreme pull creates a high-vacuum environment. Several common system faults generate this destructive resistance.
A restricted flow path serves as the primary culprit for extreme vacuum. Clogged fuel filters represent the most frequent offender. Sludge buildup in the bottom of the oil tank inevitably migrates. It travels through the copper supply lines. The sludge packs into the primary filter media. Over time, kinked copper lines also contribute to flow resistance. Any physical bottleneck creates severe suction restriction. The mechanical gears must fight this bottleneck to maintain flow.
Environmental temperatures drastically alter fluid dynamics. Cold weather significantly impacts #2 heating oil. The fluid thickness increases as the temperature drops. This happens frequently in outdoor or unprotected storage tanks. The oil begins to gel and turns highly viscous. The pump must work exponentially harder to pull this thick sludge. This added mechanical strain pushes the vacuum reading into the danger zone. It rapidly triggers the liquid-to-vapor phase shift.
System geometry heavily influences operational vacuum. Undersized suction lines generate excessive friction against the moving fluid. Moving oil through a 3/8-inch line over a long distance causes drag. Exceeding the maximum vertical lift capacity also creates trouble. Lifting oil vertically from an underground tank requires significant energy. Gravity constantly pulls the fluid downward. The pump must overcome both gravity and pipe friction. This combined resistance often exceeds engineered limits.
Safety devices can inadvertently cause operational failures. Malfunctioning oil safety valves (OSVs) sometimes fail to open fully. Stuck anti-siphon valves or faulty check valves act as artificial bottlenecks. These devices restrict the free flow of liquid fuel. They force the pump to operate far outside its designed parameters. The resulting vacuum spike guarantees immediate vapor formation.
| Condition | Primary Cause | Vacuum Reading Impact | Expected Symptom |
|---|---|---|---|
| Clogged Filter | Sludge/debris buildup | Gradual increase (>15 in. Hg) | High-pitched whining |
| Cold Oil | Low ambient temperature | Seasonal sharp increase | Intermittent cold-start noise |
| Air Leak | Loose flare fitting | Drops toward zero | Burner lockout / resetting |
A healthy fuel system acts as a perfectly sealed vacuum tube. Any breach in this integrity allows the liquid column to fall back into the tank. You will inevitably encounter situations where a burner pump loses prime repeatedly.
Copper line connections remain the most vulnerable failure points. Improperly flared copper connections plague many installations. Technicians sometimes under-tighten or cross-thread brass fittings. These errors create microscopic gaps in the mechanical seal. The erroneous use of Teflon tape on fuel oil lines causes massive headaches. Heating oil breaks down the tape over time. It creates pathways for air while shedding debris into the gears. Always use a proper 45-degree flaring tool and compatible thread sealant.
Routine maintenance can introduce new faults if performed carelessly. Oil filter housings require precise O-ring seating. Improperly seated gaskets create invisible micro-leaks. These leaks might not drip heating oil onto the floor. Instead, they draw ambient air inward under suction. This air intrusion breaks the siphon effect during off-cycles. The liquid fuel slowly drains back to the tank overnight.
Understanding your specific piping layout dictates your troubleshooting approach.
You must acknowledge when the component itself actually fails. Internal shaft seals degrade after years of continuous rotation. Worn seals allow external air to slip past the drive shaft. The internal gears pull this air inside while under heavy suction. The unit will fail to hold a consistent column of liquid. This wear usually justifies immediate replacement.
Guesswork has no place in professional HVAC diagnostics. You need measurable data to prove where the fault originates. Systematic vacuum testing provides irrefutable evidence of system health.
You cannot diagnose fuel flow issues by ear alone. You must utilize a high-quality vacuum gauge. You also need a reliable pressure gauge. Mount these instruments directly to the designated test ports on the pump body. Standard industry models provide specific ports for this exact purpose. Ensure your gauges have clean threads and functioning bleeder valves.
You need to know what normal operation looks like. Define the standard operating parameters for your specific layout. A healthy single-pipe system typically runs under 6 to 10 inches of vacuum. This reading accounts for standard lift and minimal pipe friction. Readings spiking above 15 inches indicate a dangerous operational state. The system is struggling to pull liquid. This high reading confirms a severe bottleneck exists before the gears.
You must separate the appliance from the external tank piping. The isolation test provides immediate clarity.
If the oil pump cavitation stops immediately, the fault lies in the external piping. If the whining persists, the internal strainer or gearset is compromised.
You can quickly verify the presence of active air leaks. Run the system until it establishes a stable vacuum reading. Shut off the burner power abruptly. Watch the needle on the vacuum gauge closely. A healthy system holds the vacuum steady for several minutes. If the needle drops rapidly to zero, you have confirmed an active leak. Air is entering the pipe and replacing the vacuum space.
Every diagnostic process culminates in a critical decision. You must determine whether to salvage the existing setup or install new components. Making the wrong choice leads to callback visits and wasted resources.
Many situations allow you to salvage the existing mechanical parts. You should repair the system if the vacuum reading drops after basic maintenance. Fixing a poorly flared copper fitting solves many issues. Replacing a heavily clogged paper filter often restores normal flow. Upgrading the line size from 3/8-inch to 1/2-inch reduces friction over long runs. Installing a de-aerator (like a Tiger Loop) helps manage problematic two-pipe conversions. These repairs address the environment rather than the mechanical unit.
Certain conditions demand complete component replacement. Prolonged burner oil pump cavitation causes irreversible internal scoring. The collapsing vapor bubbles physically pit the metal gear teeth. This erosion ruins the tight internal tolerances. The unit loses its ability to build and hold high pressure. You must replace the pump if you observe shaft seal leaks. You also must replace it if the unit fails to deliver steady pressure after piping fixes.
Selecting a new unit requires strict attention to specification plates. You cannot simply install whatever model sits on the van.
Never install a brand-new component into a broken environment. Replacing a damaged unit without fixing the underlying bottleneck guarantees future failure. The extreme vacuum will simply destroy the new gearset. You must locate the kinked pipe, stuck valve, or sludge blockage first. Fix the root cause, verify the vacuum reading, and then install the new parts.
Resolving heating oil delivery failures demands a structured, evidence-based approach. You must strictly follow the diagnostic hierarchy to avoid costly mistakes. Always begin by testing the vacuum to establish a baseline reading. Isolate the fuel supply using an auxiliary container to separate the variables. Find the physical restriction or the atmospheric leak in the piping network. Finally, inspect the mechanical gears for permanent erosion or seal degradation.
We highly recommend consulting a certified HVAC technician for accurate vacuum testing. Handling fuel lines requires specific tools and technical expertise. Facilities managers should always source exact-match replacement models to ensure safety. Invest in high-efficiency filters to protect your new equipment. Proactive maintenance remains the best defense against unexpected winter downtime.
A: Yes. The implosion of vapor bubbles physically pits and erodes the internal gearset, leading to permanent pressure loss. This continuous mechanical damage ruins tight manufacturing tolerances. Eventually, the unit cannot push oil through the nozzle.
A: This is almost always due to an unseated filter gasket causing an air leak, or a trapped air pocket that hasn't been properly bled from the system. Recheck the O-ring alignment and perform a thorough bleed procedure.
A: It varies by system design, but generally, readings should stay below 10-12 inches of Hg. Anything approaching 15 inches of Hg indicates a severe restriction. High readings require immediate investigation to prevent gear damage.
A: A de-aerator can eliminate air-related lockouts by continuously purging air from the oil, but it will not fix the underlying physical leak in the pipe that is letting air in. You must still locate and seal the breach.