lucy@zlwyindustry.com
+86-158-1688-2025
Please Choose Your Language
- All
- Product Name
- Product Keyword
- Product Model
- Product Summary
- Product Description
- Multi Field Search

Views: 0 Author: Site Editor Publish Time: 2026-07-23 Origin: Site


Switching fuel sources is a very common operational reality today. You might relocate a commercial kitchen, move to an off-grid property, or face localized supply disruptions. When these unexpected situations arise, adapting your heating equipment becomes an immediate priority.
State clearly that running a natural gas (NG) burner on Liquefied Petroleum Gas (LPG) without proper modification is a severe fire hazard. It also creates a massive risk for carbon monoxide buildup inside enclosed spaces. These two fuels possess completely distinct chemical and physical properties.
This article provides a technical evaluation framework for deciding whether modifying your existing setup makes sense. You will learn the exact hardware requirements involved in the process. Finally, we outline the mandatory safety checks necessary to guarantee safe, compliant operation.
Many property owners assume all utility gases behave the same way. They think plugging a propane tank directly into a standard appliance will work fine. This assumption is completely false. It is extremely dangerous. The two fuels differ greatly on a molecular level. We must understand these core technical differences before attempting any equipment modifications.
Let us first examine the vast differences in energy density. We measure fuel energy in British Thermal Units (BTUs). LPG, which primarily consists of propane and butane, holds a significantly higher energy density than natural gas. A single cubic foot of natural gas holds roughly 1,030 BTUs. In sharp contrast, LPG delivers approximately 2,500 BTUs per cubic foot. It packs more than twice the combustible energy. If you burn LPG through hardware designed for standard utility gas, you introduce double the fuel energy into the combustion chamber. This instantly results in massive, uncontrolled flames. It poses an immediate fire hazard to your property and will warp internal metal components.
Delivery pressure represents another crucial operational factor. Utility companies supply natural gas through neighborhood pipelines at very low pressures. You will typically measure this delivery pressure between 4 and 7 inches of water column (WC). However, LPG systems rely on pressurized tanks. They operate at much higher baseline pressures, usually resting between 10 and 11 inches of WC. Pushing this high-pressure fuel through a low-pressure valve system overwhelms the burner. The appliance simply cannot contain or regulate the intense fuel flow.
Finally, we must consider combustion ratios. Fuel requires oxygen to burn cleanly and safely. Because it holds a higher density, LPG needs a completely different oxygen-to-gas ratio compared to its lighter counterpart. Standard gas requires about 10 parts of air for every 1 part of fuel. Propane demands roughly 24 parts of air per part of fuel. Incorrect ratios starve the fire of oxygen. This oxygen starvation produces heavy, black soot. Worse, incomplete combustion leads to rapid, lethal carbon monoxide (CO) buildup inside your building.
| Technical Metric | Natural Gas (NG) | Liquefied Petroleum Gas (LPG) | Risk if Ignored |
|---|---|---|---|
| Energy Density (per cu. ft) | ~1,030 BTUs | ~2,500 BTUs | Massive flames, severe equipment warping, fire hazard. |
| Operating Pressure | 4 to 7 inches WC | 10 to 11 inches WC | Blown internal seals, uncontrollable fuel output. |
| Air-to-Gas Ratio | 10:1 | 24:1 | Soot production, severe carbon monoxide poisoning. |
| Specific Gravity (Air = 1.0) | 0.6 (Lighter than air) | 1.5 (Heavier than air) | LPG pools along floors instead of venting upward. |
Executing a safe natural gas burner to LPG conversion demands specific hardware alterations. You cannot simply tweak a dial or adjust a knob. You must physically replace and calibrate the internal components regulating fuel flow. Precision is vital to ensuring safe, predictable heating.
The gas orifice, commonly called a spud, dictates exactly how much fuel enters the manifold tube. It acts as a highly precise gatekeeper. Because the new fuel runs at higher pressures and contains more energy, you must restrict the physical flow. Proper gas orifice sizing is completely non-negotiable for system safety.
As a strict rule of thumb, high-density setups require much smaller orifice holes. The manufacturer calculates these exact dimensions down to fractions of a millimeter. You should never attempt DIY drilling. Some people try to modify existing orifices using standard drill bits. This almost guarantees an incorrect flow rate. If the hole is too small, the flame dies instantly. If the hole is too large, you risk a dangerous explosion. Always use the precision-machined brass fittings supplied directly by the appliance maker. You will typically find the precise size number stamped directly onto the side of the brass fitting.
Controlling the raw flow from the external tank requires specific hardware intervention. Performing a correct gas pressure adjustment protects the internal appliance valves from rupturing. You must adjust or entirely replace the primary appliance pressure regulator. Many modern dual-fuel appliances feature a convertible regulator system. You simply unscrew the top cap, flip the internal plastic plunger, and reinstall it to handle the higher pressure.
However, older models often demand a completely new regulator module. Bypassing this component represents a critical failure point. We often see DIY off-grid enthusiasts remove the regulator entirely to save time. Doing so sends full unregulated tank pressure directly into the delicate burner manifolds. This will instantly destroy internal rubber seals and cause severe internal leaks.
Changing the fuel flow accounts for only half the battle. You must also adjust the air shutters located at the base of the burner tubes. These sliding metal sleeves control the primary air mixing with the raw gas before ignition occurs. Because high-density fuel requires significantly more oxygen, you must open the shutters wider to allow maximum airflow.
Proper calibration produces a crisp, stable, completely blue flame. A yellow, lazy flame indicates incomplete combustion. Yellow flames deposit thick carbon soot onto your cookware or internal heat exchangers. They also emit dangerous levels of carbon monoxide. You must fine-tune the shutters by loosening the set screws and rotating the sleeves until the yellow tips completely disappear from the flame.
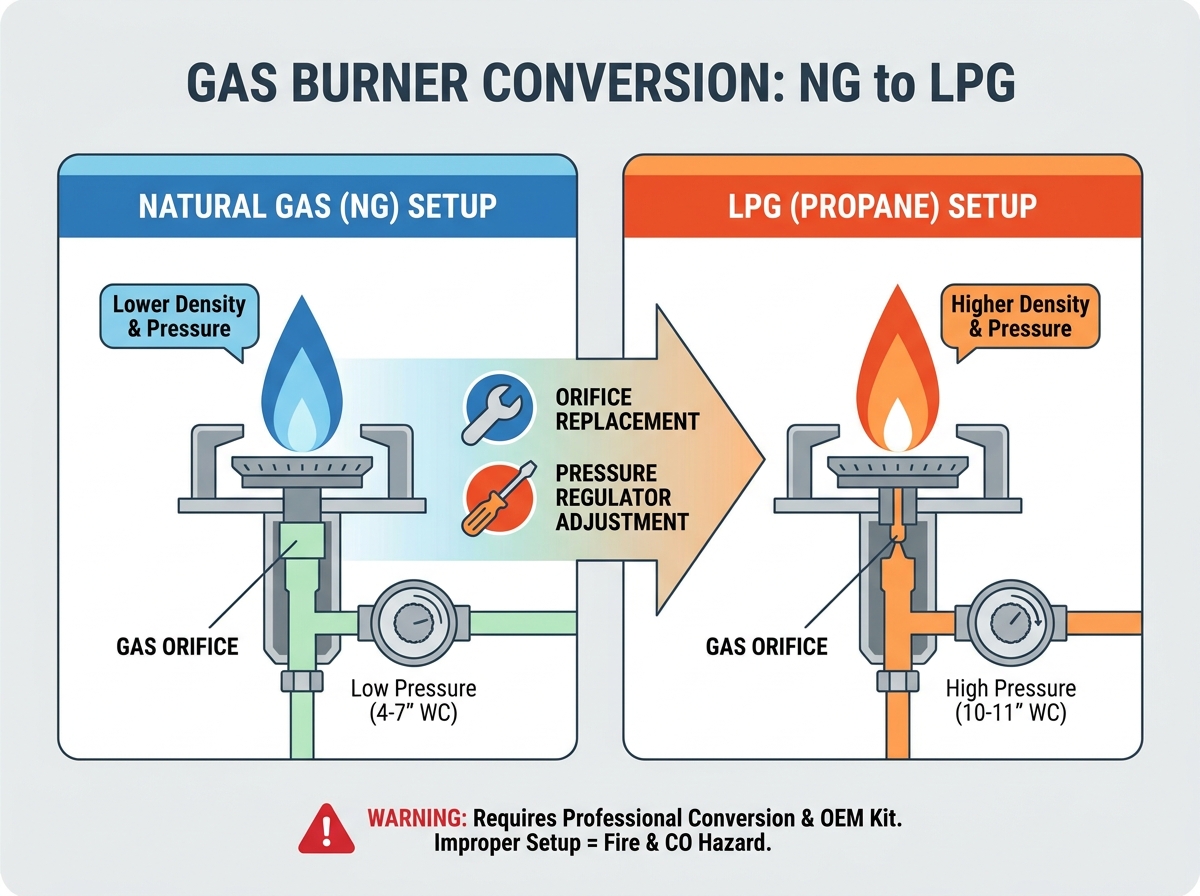
Before tearing into your appliance, you must evaluate your hardware options. The market offers various aftermarket solutions, but they do not all provide the same safety guarantees. Choosing the right parts dictates the long-term reliability of your equipment.
Original Equipment Manufacturer (OEM) kits remain the absolute gold standard in the industry. When a manufacturer designs an LPG burner conversion kit specifically for your exact model, they remove all guesswork. These sealed packages include exact orifice sizes, proper regulator springs, and detailed engineering instructions. Using an OEM kit preserves the appliance’s original safety listings. Recognized safety agencies like UL, CSA, or CE will still classify the modified equipment as fully compliant. This is the only route we recommend for residential and commercial operators.
We highly advise against using universal aftermarket kits. Universal kits attempt to cover hundreds of different appliance models with generalized, "close enough" parts. You often end up guessing which orifice size fits best based on trial and error. This guesswork significantly increases the risk of over-gassing or under-gassing the system. Over-gassing damages the heat exchanger and warps metal grates. Under-gassing leads to flame rollout, where the fire travels backward out of the intended burn area.
Sometimes, modifying older equipment simply makes no practical sense. You should consider buying a dedicated, factory-built appliance instead under these specific scenarios:
Completing the physical hardware swap represents only the first phase. Validating the safety and performance of the newly modified system is equally crucial. You cannot simply turn on the gas and hope for the best.
Many jurisdictions strictly regulate gas appliance modifications. In the UK, only Gas Safe registered engineers can legally perform these changes. Across the US, local municipal codes typically require licensed plumbers or specialized HVAC technicians. Attempting this complex work without proper certification directly violates local fire and building codes. You open yourself up to massive legal liability if a fire or injury occurs. Always hire a certified professional to handle combustible gases.
Once the technician installs the new parts, they must execute a professional burner recommissioning protocol. This process involves testing the appliance under active, working load conditions. The standard professional checklist includes several rigorous steps. First, they perform manometer testing. The technician connects a highly sensitive digital manometer to check both static and operating gas pressures. They ensure the regulator holds a steady 10-11 inches WC when the flames are burning on high. Next, they conduct flame ionization checks. They verify the electronic flame sensor reads the new flame characteristics properly, ensuring the system will automatically shut down if the fire blows out. Finally, they perform flue gas analysis. They insert a combustion analyzer probe into the exhaust vent to measure CO and O2 levels, mathematically guaranteeing clean combustion.
You cannot rely on human smell alone to detect loose connections. The technician will wave an electronic leak detector wand around every newly tightened joint. Alternatively, they apply a specialized liquid leak detector solution, watching closely for expanding bubbles that indicate micro-leaks. Furthermore, you must evaluate the room's overall ventilation. LPG exhaust profiles differ slightly, and the unburned gas is heavier than air. It pools on the floor rather than venting upward. If you operate the equipment off-grid or inside enclosed basements, you must ensure adequate lower-level airflow to prevent explosive gas pockets.
Making the final call requires evaluating your budget constraints, legal liability, and long-term heating plans. Let us break down the deciding factors so you can make an informed choice.
You need to compare the modification route against full equipment replacement. First, price out the correct OEM parts package from an authorized dealer. Next, add one to two hours of professional labor for the physical installation and testing. Compare this combined sum to the retail price of a brand-new unit. If the total modification costs exceed 50% of a new appliance's sticker price, replacement usually represents the smarter, safer path.
Consider the age and warranty status of your equipment. Unauthorized modifications instantly void most manufacturer warranties. If a third-party technician installs aftermarket parts, the brand will outright deny any future warranty claims. Furthermore, property insurance companies look very closely at ignition sources following an incident. If investigators discover a DIY gas modification, they will likely deny your damage claim. Following strict OEM guidelines and hiring licensed technicians protects your financial interests.
We recommend a straightforward, action-oriented plan for equipment owners:
Adapting a natural gas appliance to run on liquid propane is technically achievable, but it demands absolute precision. You cannot rely on guesswork when dealing with highly combustible fuels. Proper mathematical sizing of orifices and strict pressure regulation keep your property safe. Ignoring these steps leads to severe fire risks and toxic exhaust.
OEM kits paired with professional installation offer the only viable path forward. They manage your liability, preserve safety ratings, and protect your equipment's lifespan. By adhering strictly to the guidelines we discussed, you eliminate the risks of massive flames and heavy soot production.
Take action today by locating your equipment manual and finding the data plate. Consult a certified technician to assess your specific model's compatibility. Secure your property's safety by committing to doing the job right the very first time.
A: Absolutely not. Operating without the proper hardware will create dangerously high, soot-producing flames. This presents an immediate fire hazard and causes severe carbon monoxide buildup. You must physically restrict the fuel flow using specific parts to handle the higher energy density and delivery pressure safely.
A: Check the manufacturer's data plate, which is usually located on the back panel or inside the main door. It will explicitly state if the unit can accept both gases. The plate or the user manual often lists the required conversion kit part number.
A: When done correctly using original OEM parts, the burner will produce roughly the exact same BTU output as originally intended by the manufacturer. The smaller orifices restrict the higher-energy fuel, balancing the overall thermal output perfectly.
A: This depends heavily on your local jurisdiction. However, it is highly recommended, and often legally mandated, to use a certified gas engineer. You should hire a Gas Safe registered technician in the UK, or a licensed plumber and HVAC technician in the US.